Many of us are curious about understanding a website’s design without the risk of making permanent changes. The Inspect Element serves as an invaluable tool for this purpose, allowing you to make temporary changes directly in your browser.
Many of our beginner-level users told us that they find editing HTML/CSS difficult. We always recommend that those users experiment with the Inspect tool.
It is simple and easy to use, and you can see the results of your tweaks instantly. We use it all the time to preview changes ranging from minor text edits to entire layout makeovers.
This guide will walk you through the steps to use the Inspect Element effectively on your WordPress site, helping you bring those design ideas to life safely and efficiently.
What Is the Inspect Tool?
We’ve relied on browser developer tools countless times to troubleshoot and experiment with website changes. Modern web browsers like Google Chrome, Firefox, Safari, and Microsoft Edge come equipped with built-in tools designed to help web developers debug errors effortlessly.
These tools display a page’s HTML, CSS, and JavaScript code while showing how the browser processes it. For us, it’s like trying our cheat codes without affecting the actual website.
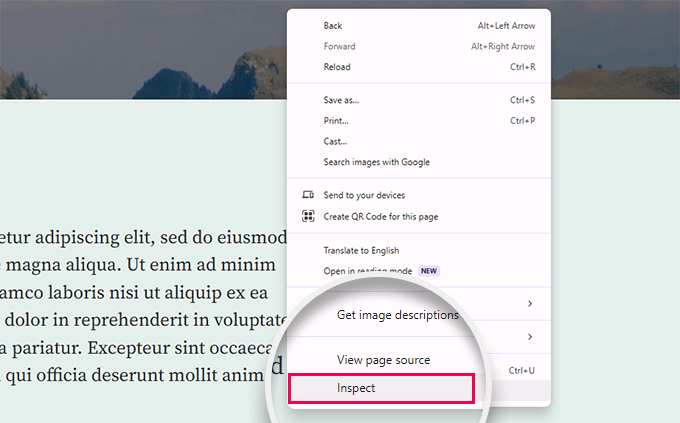
You can access these developer tools on any page by right-clicking and selecting ‘Inspect’ from the menu. It’s one of our go-to actions when testing design tweaks or debugging an issue.
With the Inspect tool, you can temporarily edit HTML, CSS, or JavaScript code and see the changes live on your screen. We’ve used it to preview everything from minor style tweaks to complete layout ideas. (We’ll show you how later in this article.)
The best part? These changes don’t affect the actual webpage. Once you reload the page or close the browser, everything returns to normal. This makes it a safe and reliable tool for testing ideas.
We’ve found it particularly helpful for DIY website owners and developers who need a quick way to test or debug. Here are just a few use cases:
- Apply new CSS styles and immediately see how they look on your site.
- Technical writers can edit HTML for screenshots, hide sensitive information, or customize visible text.
- Developers often use it to identify common WordPress errors, debug JavaScript issues, or resolve 404 errors.
And that’s just scratching the surface. These tools are incredibly versatile, making them a favorite for anyone working with websites.
In this guide, we’ll focus on the Inspect tool in Google Chrome, as it’s the most popular browser among our readers. However, Firefox, Safari, and Microsoft Edge have similar tools that can be accessed through their Inspect options.
Ready to start? Use the links below to jump to any section of the article and follow along:
- Launching The Inspect Tool and Locating The Code
- Editing and Debugging Code in Inspect Element
- Easily Find Errors on Your Site
- How to Use Inspect Tool on Mobile (iOS or Android)?
- How to Apply Inspect Element Changes Permanently in WordPress
- Best Practices When Using Inspect Element
- Frequently Asked Questions About the Inspect Element
- Video Tutorial
- Learn More About WordPress Customization
Launching The Inspect Tool and Locating The Code
You can launch the inspect tool by pressing CTRL + Shift + I (Command + Options + I for MacOS) on your keyboard.
You can also click anywhere on a web page and select ‘Inspect’ from the browser menu.

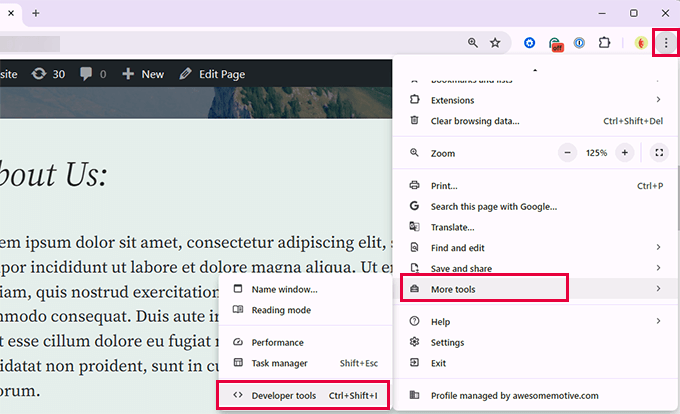
You can also access the tool from the main browser menu.
In Google Chrome, click on the three-dot menu at the top-right corner and then scroll down to More tools » Developer tools.
Your browser window will split into two.
On one side, you’ll see the page you were viewing. On the other side, you will see the HTML code and CSS rules.
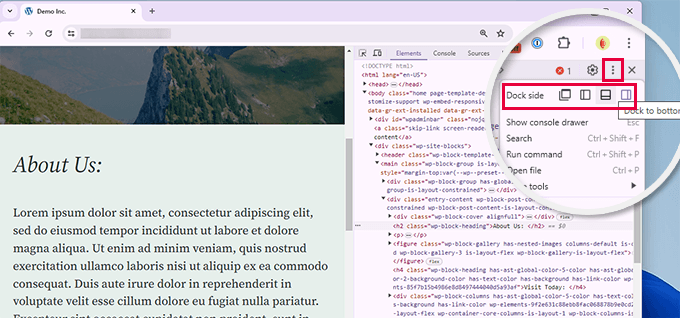
The position of the Inspect dock varies, but you can change it by clicking on the three-dot menu and selecting the ‘Dock side’ position. You can see the icon to click in the image above.
Moving your mouse over the HTML source will highlight the affected area on the web page.
You will also notice CSS rules change as you click on an element inside the HTML code.
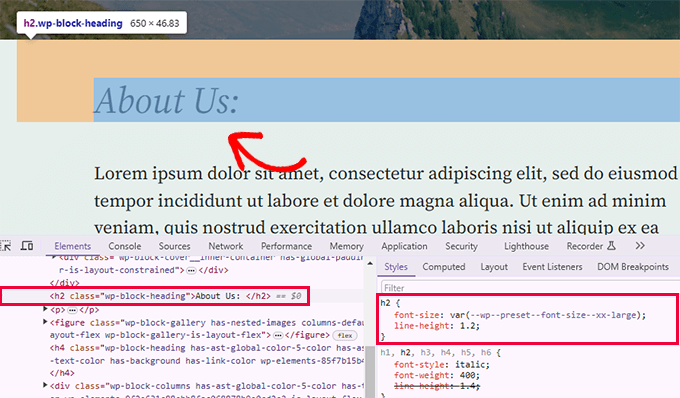
You can also take the mouse pointer to an element on the web page, right-click, and select the ‘Inspect’ tool.
The element will be highlighted in the source code.
Editing and Debugging Code in Inspect Element
Both the HTML and CSS in the inspect element window are editable. You can double-click anywhere in the HTML source code and edit the code as you like.
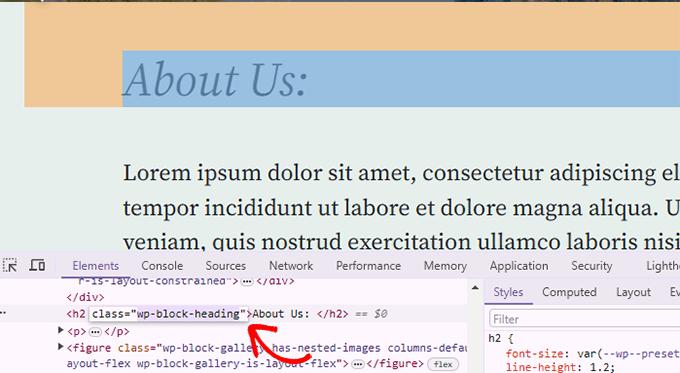
You can also double-click and edit any attributes and styles in the CSS pane.
To add a custom style rule, just click the + icon at the top of the CSS pane.
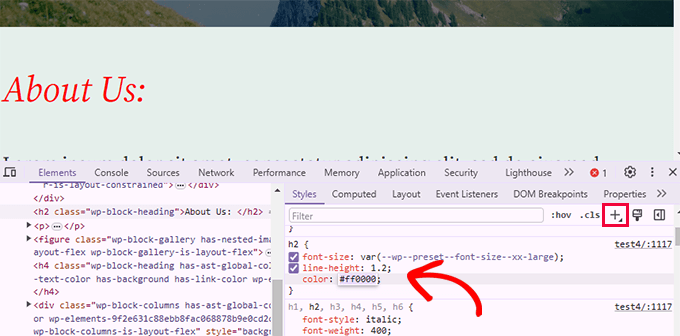
As you make changes to the CSS or HTML, those changes will be reflected in the browser instantly.
These changes will be saved in your browser’s temporary memory and won’t affect your website.
Important Note: Any changes you make here are not saved anywhere. Inspect element is a debugging tool, and it does not write your changes back to the files on your server. If you refresh the page, all your changes will be gone.
To make the changes, you will have to add custom CSS to your theme or edit the relevant template to add the changes you want to save.
Before you start editing your existing WordPress theme using the Inspect Element tool, make sure that you create a WordPress backup.
Easily Find Errors on Your Site
The Inspect tool has an area called Console, which shows errors that occurred during the page load.
When trying to debug an error or requesting support from plugin authors, it’s always helpful to look here to see if there are any errors or warnings.
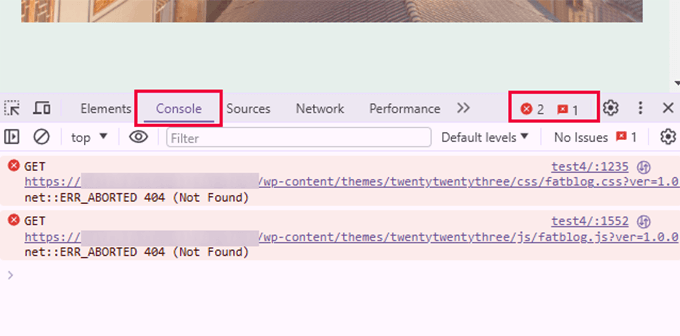
Using the Console tab, you can troubleshoot several common issues. For instance, these are only a few things you can do with the Inspect console:
- Find out why an image you added is not displaying
- Why a plugin or theme is not behaving properly
- Which plugin or browser extension may be causing the conflict
Even non-technical users can look at it to find clues about where an issue is coming from.
For example, if you are an OptinMonster customer wondering why your optin is not loading, then you can easily find the problem “Your page slug does not match.”
Using tools like the Inspect Element Console can help you gather useful technical details when something isn’t working right on your site. Sharing this information—such as error messages or missing resources—can make it easier for plugin or theme support teams to understand and resolve the issue more quickly.
How to Use Inspect Tool on Mobile (iOS or Android)?
Developer options are not turned on by default in mobile browsers, as manufacturers assume that most mobile users wouldn’t use them.
The easiest way to troubleshoot and use the inspect tool for mobile issues is to use the mobile emulation feature in your desktop browser.
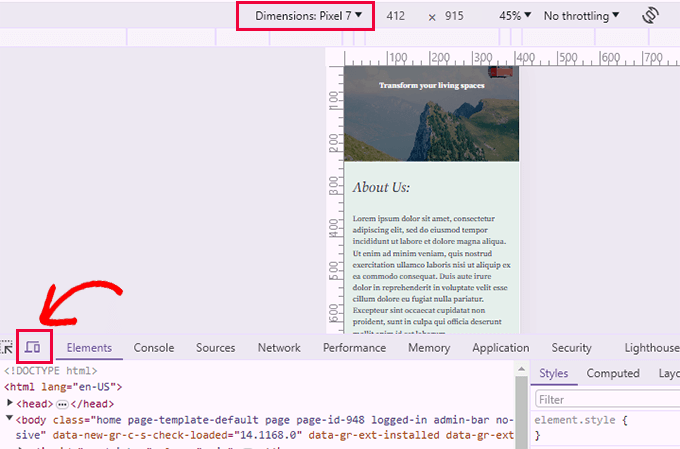
You can then choose a device from the top or screen dimensions. Chrome will then emulate that screen size for you.
How to Apply Inspect Element Changes Permanently in WordPress
When working with the Inspect Element, you might wonder how you can make the changes you’ve tested become permanent. In this section, we’ll explain how to do this on your WordPress site.
First, identify the changes you want to keep and copy them to a text file using an app like Notepad or TextEdit. Then, you can try one of the methods below.
1. Add CSS Changes to Your WordPress Site Using Site Editor

Once copied, head to your WordPress dashboard and go to Appearance » Editor to launch the site editor.
Click on the preview window to start editing your site.
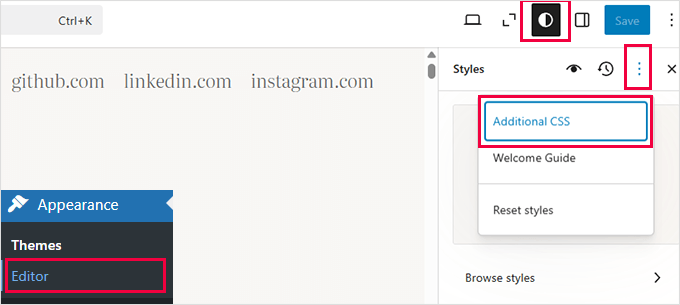
Inside the editor, click on the Style button at the top and then click on the three-dot menu and select ‘Additional CSS’.
This open the Additional CSS panel, where you can simply paste the CSS you want to save.
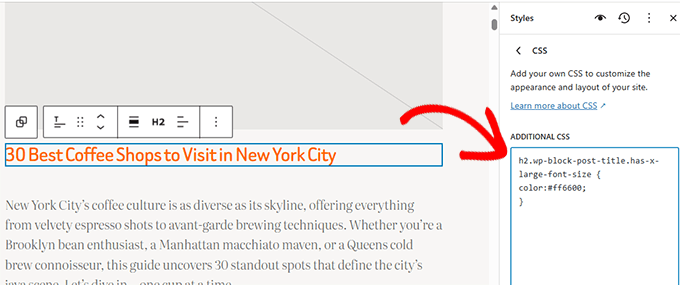
You may see your changes apply instantly in the preview window. Don’t forget to click ‘Save’ to publish your changes.
2. Add Custom CSS to Your Site Using WPCode
If you need an easier way to add custom CSS to your site, then this method is for you.
For this method, we’ll use WPCode. It is the best WordPress code snippets manager and lets you add custom code, HTML, and CSS to your site without editing your theme.
Note: There is also a free version of WPCode that you can use. However, we recommend upgrading to a paid plan to unlock its full potential.
We use WPCode on our own sites because it makes it easier to manage code. More importantly, it has a built-in failsafe that disables your code if it returns an error. For details, see our full WPCode review.
First, you need to install and activate the WPCode plugin. If you need help, see our tutorial on how to install a WordPress plugin for instructions.
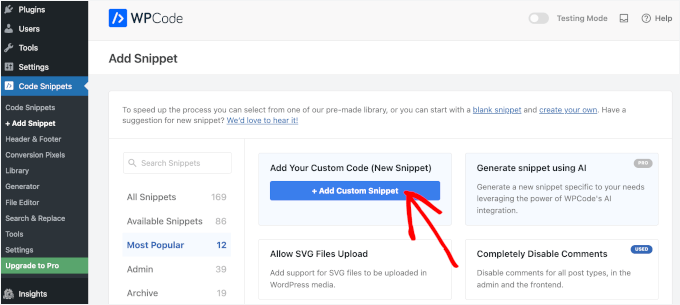
Upon activation, simply go to Code Snippets » + Add New from the WordPress admin dashboard.
Then, you can hover over the ‘Add Your Custom Code (New Snippet)’ option in the code snippets library and click ‘+ Add custom Snippet.’
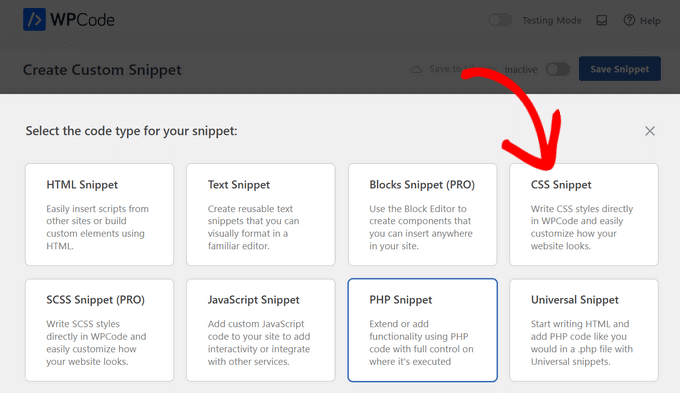
After that, you need to select ‘CSS Snippet’ as the code type from the list of options that appear on the screen.
Next, at the top of the page, you can add a title for your custom CSS snippet. This can be anything that helps you identify the code.
Once you’ve entered a title, you can write down or paste your custom CSS into the ‘Code Preview’ box.
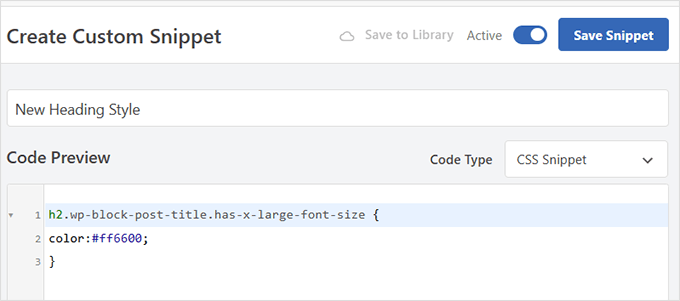
After adding your custom CSS code, click on the ‘Save Snippet’ button and click the status toggle to ‘Active’.
3. Add HTML Snippet to Your WordPress Site
To add HTML changes to your site, you need to paste them in the right template file in your theme.
To figure out which theme file to edit, see our guide on how to find which files to edit in WordPress theme.
You’ll need to use an FTP client or the file manager app under your hosting account to edit your theme files.
Alternatively, you can also use WPCode to add custom HTML snippets. Simply add a new code snippet and select HTML as your snippet type.
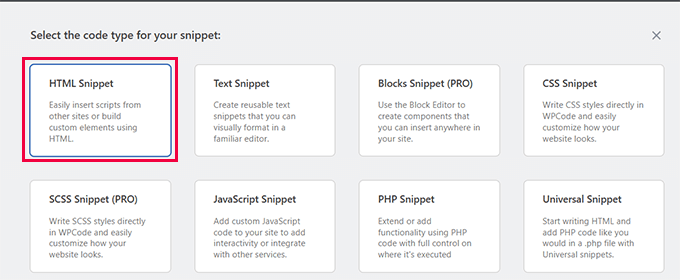
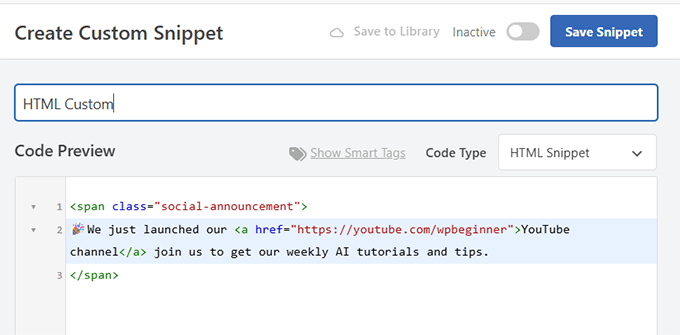
After that, provide a title for your HTML snippet that helps you identify it.
Below that, add your custom HTML code in the preview box.
WPCode let’s you choose where you want to insert any code snippet.
Scroll down to the ‘Insertion’ area and click the ‘Location’ to view available options.
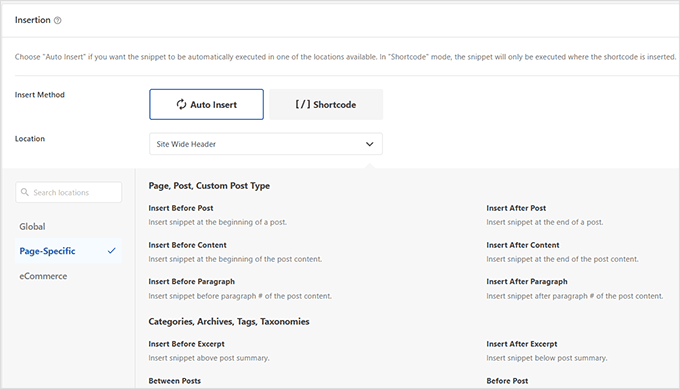
After selecting a location, don’t forget to click ‘Save’ and toggle the snippet status to Active.
You can now visit your site to see it in action.

Best Practices When Using Inspect Element
Using the Inspect tool can feel like opening a secret window into web design. But to make the most of it, here are some best practices, especially helpful if you’re just starting out:
- Start by exploring safely: Any changes you make in Inspect Element are temporary. So feel free to experiment without fear—nothing breaks permanently.
- Try out different styles and layouts: Test colors, fonts, spacing, or positioning to see what looks good before applying changes to your actual theme or stylesheet.
- Keep notes on what works: If you like a change, copy the CSS and paste it into a text file or note-taking app so you don’t lose it.
- Test across browsers: A design tweak that looks great in Chrome might look off in Firefox or Safari, so always double-check.
- Stay organized: Keep a record of all changes you’ve made and why. This helps if you ever need to reverse something or troubleshoot issues later.
- Don’t edit live sites casually: If you’re learning, it’s better to practice on a staging site or a test environment to avoid accidental issues on your live site.
Frequently Asked Questions About the Inspect Element
The following are some of the most commonly asked questions by our users about using the Inspect tool.
1. Can I use the Inspect tool on any website or just my own?
Yes, you can use the inspect tool on any website. Simply right-click and select the Inspect tool from the browser menu to see the code behind any website. Studying the code on other websites is a quick way to learn and improve your own CSS/HTML skills.
2. Why can’t I find the Inspect tool in my browser?
Google Chrome may hide the Inspect option in the right-click menu, particularly when multiple extensions add their own options to the right-click menu.
Additionally, the right-click function may be disabled using JavaScript, which can hide the ‘Inspect’ option. In such cases, you can still open Developer Tools by using the keyboard shortcut Ctrl + Shift + I (or Cmd + Option + I on Mac) or by navigating to Menu » More Tools » Developer Tools.
3. Can I see changes across different browsers?
Yes, Inspect Element is available in major browsers, allowing you to test and observe changes in Chrome, Firefox, Safari, and Edge.
4. How can Inspect Element help with JavaScript debugging?
Inspect Element includes a Console tab where you can see JavaScript errors and warnings. This tool is incredibly helpful when you need to understand what’s going wrong with scripts on your site. It’s like having a direct line to the browser’s thought process, allowing you to pinpoint issues quickly.
5. Can Inspect Element affect my website’s security?
No, using Inspect Element will not affect your website’s security. It’s a browser tool that temporarily changes how the site appears or behaves on your local machine without altering the backend data or its integrity.
Video Tutorial
Learn More About WordPress Customization
If you want to explore further how you can use the Inspect tool to do more things on your WordPress site, the following resources will be a good starting point:
- How to customize your WordPress theme – This beginner’s guide shows how to customize your WordPress theme step-by-step.
- How to properly add custom CSS in WordPress – This tutorial shows multiple ways to easily add your custom CSS in WordPress.
- How to optimize CSS delivery in WordPress – Too many individual CSS files can degrade performance. This tutorial shows how to optimize CSS delivery to boost WordPress speed.
- Default WordPress-generated CSS cheat sheet – This handy guide will show you many CSS classes that WordPress adds to different elements by default. You can then use those CSS classes in your custom CSS code to change the appearance of those elements.
We hope this article helped you learn the basics of the Inspect Element and how to use it with your WordPress site. You may also want to see our default WordPress generated CSS cheat sheet to speed up your theme development skills or our ultimate WordPress toolkit for pros.
If you liked this article, then please subscribe to our YouTube Channel for WordPress video tutorials. You can also find us on Twitter and Facebook.


Dennis Muthomi
The mobile emulation feature is the best tool, just the other day, I was trying to figure out why my site wasn’t displaying well on iPhones. The emulation feature allowed me to quickly diagnose that an element wasn’t scaling down correctly.
Being able to visually debug responsive issues across various devices without needing to test on physical devices saves so much time.
Dayo Olobayo
You’ve got the right idea. Mobile emulation is super useful for basic checks. It’s important to remember though that emulators can’t perfectly replicate every device and browser combination. Testing on a few physical devices whenever possible is still a good practice.
Mrteesurez
Yes, I completely agree, the mobile emulation feature is a game-changer. I’ve had a similar experience where my site looked perfect on desktop but had issues on specific mobile devices. Using emulation, I quickly identified that my navigation menu was breaking on smaller screens. This feature not only saved me the hassle of testing on multiple physical devices but also allowed me to fix the issue in real-time. It’s a must-have tool for anyone serious about responsive design, ensuring your site looks great no matter where it’s viewed.
Thanks for sharing your experience.
Mrteesurez
This is helpful, I don’t know one can actually edit the code and see changes in real time.
My question:
1) Can I use the inspection tool to see the PHP or anynbackend code ??
2) Is there anyway I can use the inspection tool on mobile ??
WPBeginner Support
You would not use the inspection tool to see PHP it is normally used to check HTML, CSS, and JavaScript. For mobile it is not available by default but there are apps to add the ability to mobile.
Admin
Mrteesurez
Thanks the support, In short the inspection tool is only for checking frontend codes, ok.
Which app can I use to add the ability to mobile to be able to inspect on mobile ?
WPBeginner Comments
The best option may be to use a cross-browser testing tool, such as some of the ones listed in this guide: https://www.wpbeginner.com/wp-tutorials/how-to-test-a-wordpress-site-in-different-browsers-cross-browser-testing-made-easy/
For simple inspections, you may even be able to use a browser on a desktop and use the mobile view: https://www.wpbeginner.com/beginners-guide/how-to-preview-the-mobile-layout-of-your-site/
Jiří Vaněk
Thanks for this guide. Now is much more easier for me to find CSS class in code for making any changes. The CSS code can make AI for me, becouse Im not good at coding, and rest Im able to find in isnpect tools. That is all what I need.
hossam ismail
hey!
I can’t change my heading font size in mobile version.
For example,
Heading font size in desktop is 24px
but it is also 24px in mobile ??
this issue especially with heading, how can i fix this?
WPBeginner Support
If you reach out to your theme’s support they should be able to let you know how they have set up the mobile CSS
Admin
Esmeraldo Lleshi
How can I make the html that i edited to stay permanently?
WPBeginner Support
It would depend on what was edited, if is CSS then you would add the CSS under Appeaance>Customize>Additional CSS. If it is more of an HTML change then you would want to check with your theme’s support as WordPress themes are built with templates, for a bit more on that you would want to take a look at our glossary page here: https://www.wpbeginner.com/glossary/template/
Admin
Milan
Once I make changes, how I can save update/edited page? Whenever I close it it revert to previous version.
WPBeginner Support
Inspect element is for testing the changes, if you’re editing the CSS you would want to copy the CSS you added and paste it under Appearance>Custmize>Additional CSS
Admin
Kristina
My dilemma is that once I inspect an element, I’d like to know what PAGE in my theme this element appears on. So there’s an e lement that appears as part of my theme, throughout my site, and when I inspect element, i can see the code, but can’t determine what portion of the theme has it, so that I can change it in the child theme, permanently. I tried editing one page, directly from the inspect element pane, but as soon as I exited and returned, my change was gone and it was “back to normal.”
Anyway to inspect to element and determine where I can find it in my theme files?
Thank you.
WPBeginner Support
Hi Kristina,
You can try to guessing the template file based on where the code appears in the page layout. For example, if it is in header section then you may look for it in the header.php file. You can also download all your theme files via FTP and then use a tool that allows you to search for text in multiple files at once. One such app is Notepad++ (for Windows), open the app and the go to Search > Search in Files.
Admin
stephanie
This is such great content, thanks a lot for sharing.
Little problem for me, nothing happens when i click ‘inspect element’ in my chrome browser. Any help or suggestions?
WPBeginner Support
Hi Stephanie,
If you are using any browser extensions, then uninstall all of them. If the problem persists, then try reinstalling Google Chrome.
Admin
avinash
Sir,
Actually i am new in wordpress can you tell where from i can edit the Html elememt and where i
can found the element.style in wordpress theme.
Isaac Anim
This is a very great post you have here. But I need to draw your attention to something.
I don’t know if you have noticed but this particular article has being stolen. It looks like the culprit only goes around the web stealing content. As I write this comment, he has copied about 5 of my articles.
The website is even not in Google Search. I was just checking how my website looks in Yandex search results and I happen to find this thief.
Here is the link to the stolen article
WPBeginner Support
Thanks for notifying us, we will take the appropriate action.
Admin
Ethan
I am curious, why isn’t your website mobile friendly?
Saviour Sanders
I’ve been wondering about the same thing.
Sila Mahamud
Customizing WordPress for DIY Users and you have also highlighted What is Inspect Element or Developer Tools? You also given us the video tutorial the basic of inspect elements. To be honest that is great content wherever you share with us. Thanks a lot for sharing this content with us.
WPBeginner Support
Glad you found it helpful. Don’t forget to follow us on Facebook for more WordPress tutorials.
Admin