注意
- MCP support is currently in 公共预览版 and subject to change.
- MCP support is available in Copilot Chat for Visual Studio Code, JetBrains, Eclipse, and Xcode.
- The GitHub 预发行许可条款 apply to your use of this product.
Overview
The Model Context Protocol (MCP) is an open standard that defines how applications share context with large language models (LLMs). MCP provides a standardized way to connect AI models to different data sources and tools, enabling them to work together more effectively.
You can use MCP to extend the capabilities of Copilot Chat by integrating it with a wide range of existing tools and services. For example, the GitHub MCP server allows you to use Copilot Chat in Visual Studio Code to perform tasks on GitHub. You can also use MCP to create new tools and services that work with Copilot Chat, allowing you to customize and enhance your experience.
For more information on MCP, see the official MCP documentation.
For information on some of the other currently available MCP servers, see the MCP servers repository.
Prerequisites
- Access to Copilot. 有关如何访问 Copilot 的信息,请参阅“什么是 GitHub Copilot?”。
- Visual Studio Code version 1.99 or later. For information on installing Visual Studio Code, see the Visual Studio Code download page.
Configuring MCP servers in Visual Studio Code
To configure MCP servers in Visual Studio Code, you need to set up a configuration script that specifies the details of the MCP servers you want to use. You can configure MCP servers for either:
-
A specific repository. This enables you to share MCP servers with anyone who opens the project in Visual Studio Code. To do this, create a
.vscode/mcp.jsonfile in the root of your repository. -
Your personal instance of Visual Studio Code. You will be the only person who has access to configured MCP servers. To do this, add the configuration to your
settings.jsonfile in Visual Studio Code. MCP servers configured this way will be available in all workspaces.注意
We recommend you use only one location per server. Adding the same server to both locations may cause conflicts and unexpected behavior.
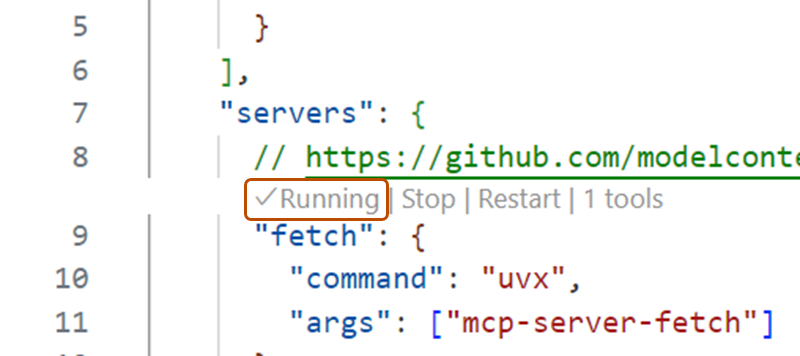
The steps below show how to configure the Fetch MCP server in your .vscode/mcp.json file. The Fetch MCP server is a simple MCP server that provides web content fetching capabilities. For more information on the Fetch MCP server, see the Fetch directory in the MCP Server repository.
You can use the same steps to configure MCP servers in your personal Visual Studio Code settings. Details on how to configure other MCP servers are available in the MCP servers repository.
For information on configuring the GitHub MCP server, see Using the GitHub MCP Server.
-
Add the following configuration to your
.vscode/mcp.jsonfile:JSON { "inputs": [ // The "inputs" section defines the inputs required for the MCP server configuration. { "type": "promptString" } ], "servers": { // The "servers" section defines the MCP servers you want to use. "fetch": { "command": "uvx", "args": ["mcp-server-fetch"] } } }{ "inputs": [ // The "inputs" section defines the inputs required for the MCP server configuration. { "type": "promptString" } ], "servers": { // The "servers" section defines the MCP servers you want to use. "fetch": { "command": "uvx", "args": ["mcp-server-fetch"] } } } -
Save the
.vscode/mcp.jsonfile. -
A "Start" button will appear in your
.vscode/mcp.jsonfile, at the top of the list of servers. Click the "Start" button to start the MCP servers. This will trigger the input dialog and discover the server tools, which are then stored for later sessions.
-
Open Copilot Chat by clicking the icon in the title bar of Visual Studio Code.
-
In the Copilot Chat box, select Agent from the popup menu.

-
To view your list of available MCP servers, click the tools icon in the top left corner of the chat box. This will open the MCP server list, where you can see all the MCP servers and associated tools that are currently available in your Visual Studio Code instance.
- Optionally, you can define toolsets, groups of related tools that you can reference in chat. Toolsets make it easier to group related MCP tools together and quickly enable or disable them. For information on how to define and use a toolset, see the VS Code docs.


For more information on configuring MCP servers in Visual Studio Code, see Use MCP servers in Visual Studio Code (Preview) in the Visual Studio Code documentation.
Using MCP servers in Copilot Chat
Once you have configured your MCP servers, you can use them in Copilot Chat to access a wide range of tools and services. In the example below, we will use the Fetch MCP server to fetch details about a web page.
-
若要打开聊天视图,请单击活动栏中的聊天图标或按 Control+Command+i (Mac) / Ctrl+Alt+i (Windows/Linux)。
-
In the Copilot Chat box, select Agent from the popup menu.
-
In the file with the MCP configuration, check that the MCP server is running. If it is not running, click the "Start" button to start the MCP server.
-
Ask Copilot Chat to fetch the details of a URL. For example:
Fetch https://github.com/github/docs. -
If Copilot asks you to confirm that you want to proceed, click Continue.
-
Copilot will fetch the details of the URL and display them in the chat box.

Optionally, you can use MCP prompts and resources in VS Code.
- MCP servers can define preconfigured prompts for interacting with their tools. You can access these prompts in chat with slash commands, using the format
/mcp.servername.promptname. - MCP servers provide resources, which are any kind of data that the server wants to make available. For example, the GitHub MCP server provides repository content as a resource. To add resources from an MCP server to your chat context, click Add Context... in the chat box, then click MCP Resources.
For more information on using MCP servers in Visual Studio Code, see Use MCP servers in Visual Studio Code (Preview) in the Visual Studio Code documentation.
Using existing MCP configurations
If you already have an MCP configuration in Claude Desktop, you can use that configuration in Visual Studio Code to access the same MCP servers. To do this, add the following configuration to your settings.json file in Visual Studio Code:
"chat.mcp.discovery.enabled": true
"chat.mcp.discovery.enabled": true
Visual Studio Code will automatically find your existing configuration and use it in your Visual Studio Code instance.
Overview
模型上下文协议 (MCP) 是一个开放标准,用于定义应用程序与大型语言模型 (LLM) 共享上下文的方式。 MCP 提供了一种将 AI 模型与不同的数据源和工具连接起来的标准化方式,使它们能够更高效地协同工作。
可以使用 MCP 将 Copilot Chat 与各种现有工具和服务集成,从而扩展其功能。 你还可以使用 MCP 创建可与 Copilot Chat 协同工作的新工具和服务,从而自定义并增强你的使用体验。
有关 MCP 的详细信息,请参阅官方 MCP 文档。
For information on other currently available MCP servers, see the MCP servers repository.
Prerequisites
-
Access to Copilot. 有关如何访问 Copilot 的信息,请参阅“什么是 GitHub Copilot?”。
-
A compatible JetBrains IDE. GitHub Copilot is compatible with the following IDEs:
- IntelliJ IDEA(旗舰版、社区版、教育版)
- Android Studio
- AppCode
- CLion
- Code With Me Guest
- DataGrip
- DataSpell
- GoLand
- JetBrains Client
- MPS
- PhpStorm
- PyCharm(专业版、社区版、教育版)
- Rider
- RubyMine
- RustRover
- WebStorm
- Writerside
请参阅 JetBrains IDE 工具查找器进行下载。
-
GitHub Copilot**** 插件。 请参阅 JetBrains Marketplace 中的 GitHub Copilot 插件。 有关安装说明,请参阅“在环境中安装 GitHub Copilot 扩展”。
-
在 JetBrains IDE 中登录到 GitHub。 有关身份验证说明,请参阅“在环境中安装 GitHub Copilot 扩展”。
Configuring MCP servers in JetBrains IDEs
-
In the lower right corner, click .
-
From the menu, select "Edit settings".
-
Under the MCP section, click "Edit in
mcp.json". -
Define your MCP servers. You can use the following configuration as an example:
JSON { "servers": { "memory": { "command": "npx", "args": [ "-y", "@modelcontextprotocol/server-memory" ] } } }{ "servers": { "memory": { "command": "npx", "args": [ "-y", "@modelcontextprotocol/server-memory" ] } } }
Alternatively, to access the MCP settings, once you're in "Agent Mode", click the tools icon, then click Add more tools.
Overview
模型上下文协议 (MCP) 是一个开放标准,用于定义应用程序与大型语言模型 (LLM) 共享上下文的方式。 MCP 提供了一种将 AI 模型与不同的数据源和工具连接起来的标准化方式,使它们能够更高效地协同工作。
可以使用 MCP 将 Copilot Chat 与各种现有工具和服务集成,从而扩展其功能。 你还可以使用 MCP 创建可与 Copilot Chat 协同工作的新工具和服务,从而自定义并增强你的使用体验。
有关 MCP 的详细信息,请参阅官方 MCP 文档。
For information on other currently available MCP servers, see the MCP servers repository.
Prerequisites
- Access to Copilot. 有关如何访问 Copilot 的信息,请参阅“什么是 GitHub Copilot?”。
- GitHub Copilot for Xcode extension. See 在环境中安装 GitHub Copilot 扩展.
Configuring MCP servers in Xcode
-
Open the GitHub Copilot for Xcode extension.
-
In agent mode, click the tools icon.
-
Select "Edit config".
-
Define your MCP servers, editing
mcp.json. You can use the following configuration as an example:JSON { "servers": { "memory": { "command": "npx", "args": [ "-y", "@modelcontextprotocol/server-memory" ] } } }{ "servers": { "memory": { "command": "npx", "args": [ "-y", "@modelcontextprotocol/server-memory" ] } } }
Overview
模型上下文协议 (MCP) 是一个开放标准,用于定义应用程序与大型语言模型 (LLM) 共享上下文的方式。 MCP 提供了一种将 AI 模型与不同的数据源和工具连接起来的标准化方式,使它们能够更高效地协同工作。
可以使用 MCP 将 Copilot Chat 与各种现有工具和服务集成,从而扩展其功能。 你还可以使用 MCP 创建可与 Copilot Chat 协同工作的新工具和服务,从而自定义并增强你的使用体验。
有关 MCP 的详细信息,请参阅官方 MCP 文档。
For information on other currently available MCP servers, see the MCP servers repository.
Prerequisites
- 对 Copilot 的访问权限****。 若要在 Eclipse 中使用 GitHub Copilot,需要拥有有效的 GitHub Copilot 订阅。 有关如何访问 Copilot 的信息,请参阅“什么是 GitHub Copilot?”。
- 兼容的 Eclipse 版本****。 若要使用 GitHub Copilot 扩展,必须拥有 Eclipse 版本 2024-09 或更高版本。 请参阅 Eclipse 下载页。
- Latest version of the GitHub Copilot extension. Download this from the Eclipse Marketplace. For more information, see 在环境中安装 GitHub Copilot 扩展.
- Sign in to GitHub from Eclipse.
Configuring MCP servers in Eclipse
-
To open the Copilot Chat panel, click the Copilot icon () in the status bar at the bottom of Eclipse.
-
From the menu, select "Edit preferences".
-
In the left pane, expand Copilot Chat and click MCP.
-
Define your MCP servers. You can use the following configuration as an example:
JSON { "servers": { "memory": { "command": "npx", "args": [ "-y", "@modelcontextprotocol/server-memory" ] } } }{ "servers": { "memory": { "command": "npx", "args": [ "-y", "@modelcontextprotocol/server-memory" ] } } }
Creating a new MCP server
You can create a new MCP server to fulfill your specific needs, and then integrate it with Copilot Chat. For example, you can create an MCP server that connects to a database or a web service, and then use that server in Copilot Chat to perform tasks on that database or web service.
For more information on creating and configuring your own MCP servers, see the official MCP documentation.