メモ
- MCP support is currently in パブリック プレビュー and subject to change.
- MCP support is available in Copilot Chat for Visual Studio Code, JetBrains, Eclipse, and Xcode.
- The GitHub プレリリース ライセンス条項 apply to your use of this product.
Overview
The Model Context Protocol (MCP) is an open standard that defines how applications share context with large language models (LLMs). MCP provides a standardized way to connect AI models to different data sources and tools, enabling them to work together more effectively.
You can use MCP to extend the capabilities of Copilot Chat by integrating it with a wide range of existing tools and services. For example, the GitHub MCP server allows you to use Copilot Chat in Visual Studio Code to perform tasks on GitHub. You can also use MCP to create new tools and services that work with Copilot Chat, allowing you to customize and enhance your experience.
For more information on MCP, see the official MCP documentation.
For information on some of the other currently available MCP servers, see the MCP servers repository.
Prerequisites
- Access to Copilot. Copilot のアクセス方法の詳細については、「GitHub Copilot とは何ですか?」を参照してください。
- Visual Studio Code version 1.99 or later. For information on installing Visual Studio Code, see the Visual Studio Code download page.
Configuring MCP servers in Visual Studio Code
To configure MCP servers in Visual Studio Code, you need to set up a configuration script that specifies the details of the MCP servers you want to use. You can configure MCP servers for either:
-
A specific repository. This enables you to share MCP servers with anyone who opens the project in Visual Studio Code. To do this, create a
.vscode/mcp.jsonfile in the root of your repository. -
Your personal instance of Visual Studio Code. You will be the only person who has access to configured MCP servers. To do this, add the configuration to your
settings.jsonfile in Visual Studio Code. MCP servers configured this way will be available in all workspaces.メモ
We recommend you use only one location per server. Adding the same server to both locations may cause conflicts and unexpected behavior.
The steps below show how to configure the Fetch MCP server in your .vscode/mcp.json file. The Fetch MCP server is a simple MCP server that provides web content fetching capabilities. For more information on the Fetch MCP server, see the Fetch directory in the MCP Server repository.
You can use the same steps to configure MCP servers in your personal Visual Studio Code settings. Details on how to configure other MCP servers are available in the MCP servers repository.
For information on configuring the GitHub MCP server, see Using the GitHub MCP Server.
-
Add the following configuration to your
.vscode/mcp.jsonfile:JSON { "inputs": [ // The "inputs" section defines the inputs required for the MCP server configuration. { "type": "promptString" } ], "servers": { // The "servers" section defines the MCP servers you want to use. "fetch": { "command": "uvx", "args": ["mcp-server-fetch"] } } }{ "inputs": [ // The "inputs" section defines the inputs required for the MCP server configuration. { "type": "promptString" } ], "servers": { // The "servers" section defines the MCP servers you want to use. "fetch": { "command": "uvx", "args": ["mcp-server-fetch"] } } } -
Save the
.vscode/mcp.jsonfile. -
A "Start" button will appear in your
.vscode/mcp.jsonfile, at the top of the list of servers. Click the "Start" button to start the MCP servers. This will trigger the input dialog and discover the server tools, which are then stored for later sessions.
-
Open Copilot Chat by clicking the icon in the title bar of Visual Studio Code.
-
In the Copilot Chat box, select Agent from the popup menu.

-
To view your list of available MCP servers, click the tools icon in the top left corner of the chat box. This will open the MCP server list, where you can see all the MCP servers and associated tools that are currently available in your Visual Studio Code instance.
- Optionally, you can define toolsets, groups of related tools that you can reference in chat. Toolsets make it easier to group related MCP tools together and quickly enable or disable them. For information on how to define and use a toolset, see the VS Code docs.


For more information on configuring MCP servers in Visual Studio Code, see Use MCP servers in Visual Studio Code (Preview) in the Visual Studio Code documentation.
Using MCP servers in Copilot Chat
Once you have configured your MCP servers, you can use them in Copilot Chat to access a wide range of tools and services. In the example below, we will use the Fetch MCP server to fetch details about a web page.
-
Visual Studio Code のタイトル バーの アイコンをクリックして、Copilot Chat を開きます。
-
Copilot Chat ボックスで、ポップアップ メニューから [Agent] を選びます。
-
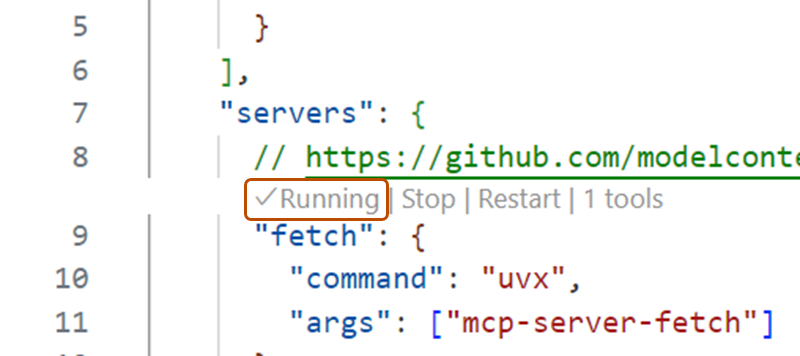
In the file with the MCP configuration, check that the MCP server is running. If it is not running, click the "Start" button to start the MCP server.
-
Ask Copilot Chat to fetch the details of a URL. For example:
Fetch https://github.com/github/docs. -
If Copilot asks you to confirm that you want to proceed, click Continue.
-
Copilot will fetch the details of the URL and display them in the chat box.

Optionally, you can use MCP prompts and resources in VS Code.
- MCP servers can define preconfigured prompts for interacting with their tools. You can access these prompts in chat with slash commands, using the format
/mcp.servername.promptname. - MCP servers provide resources, which are any kind of data that the server wants to make available. For example, the GitHub MCP server provides repository content as a resource. To add resources from an MCP server to your chat context, click Add Context... in the chat box, then click MCP Resources.
For more information on using MCP servers in Visual Studio Code, see Use MCP servers in Visual Studio Code (Preview) in the Visual Studio Code documentation.
Using existing MCP configurations
If you already have an MCP configuration in Claude Desktop, you can use that configuration in Visual Studio Code to access the same MCP servers. To do this, add the following configuration to your settings.json file in Visual Studio Code:
"chat.mcp.discovery.enabled": true
"chat.mcp.discovery.enabled": true
Visual Studio Code will automatically find your existing configuration and use it in your Visual Studio Code instance.
Overview
モデル コンテキスト プロトコル (MCP) は、アプリケーションが大規模言語モデル (LLM) とコンテキストを共有する方法を定義するオープン標準です。 MCP は、AI モデルをさまざまなデータ ソースとツールに接続する標準化された方法を提供し、それらがより効果的に連携できるようにします。
MCP を使用すると、Copilot Chat を既存のさまざまなツールやサービスと統合することで機能を拡張できます。 また、MCP を使用して、Copilot Chat で動作する新しいツールとサービスを作成することもでき、エクスペリエンスをカスタマイズおよび強化できます。
MCP の詳細については、MCP 公式ドキュメントを参照してください。
For information on other currently available MCP servers, see the MCP servers repository.
Prerequisites
-
Access to Copilot. Copilot のアクセス方法の詳細については、「GitHub Copilot とは何ですか?」を参照してください。
-
A compatible JetBrains IDE. GitHub Copilot is compatible with the following IDEs:
- IntelliJ IDEA (Ultimate、Community、Educational)
- Android Studio
- AppCode
- CLion
- Code With Me ゲスト
- DataGrip
- DataSpell
- GoLand
- JetBrains クライアント
- MPS
- PhpStorm
- PyCharm (Professional、Community、Educational)
- Rider
- RubyMine
- RustRover
- WebStorm
- Writerside
ダウンロードするには、JetBrains IDE のツール ファインダーを参照してください。
-
GitHub Copilot プラグイン。 JetBrains Marketplace で「GitHub Copilot プラグイン」を確認してください。 インストール手順については、「環境への GitHub Copilot 拡張機能のインストール」を参照してください。
-
JetBrains IDE で GitHub にログイン。 認証手順については、「環境への GitHub Copilot 拡張機能のインストール」を参照してください。
Configuring MCP servers in JetBrains IDEs
-
In the lower right corner, click .
-
From the menu, select "Edit settings".
-
Under the MCP section, click "Edit in
mcp.json". -
Define your MCP servers. You can use the following configuration as an example:
JSON { "servers": { "memory": { "command": "npx", "args": [ "-y", "@modelcontextprotocol/server-memory" ] } } }{ "servers": { "memory": { "command": "npx", "args": [ "-y", "@modelcontextprotocol/server-memory" ] } } }
Alternatively, to access the MCP settings, once you're in "Agent Mode", click the tools icon, then click Add more tools.
Overview
モデル コンテキスト プロトコル (MCP) は、アプリケーションが大規模言語モデル (LLM) とコンテキストを共有する方法を定義するオープン標準です。 MCP は、AI モデルをさまざまなデータ ソースとツールに接続する標準化された方法を提供し、それらがより効果的に連携できるようにします。
MCP を使用すると、Copilot Chat を既存のさまざまなツールやサービスと統合することで機能を拡張できます。 また、MCP を使用して、Copilot Chat で動作する新しいツールとサービスを作成することもでき、エクスペリエンスをカスタマイズおよび強化できます。
MCP の詳細については、MCP 公式ドキュメントを参照してください。
For information on other currently available MCP servers, see the MCP servers repository.
Prerequisites
- Access to Copilot. Copilot のアクセス方法の詳細については、「GitHub Copilot とは何ですか?」を参照してください。
- GitHub Copilot for Xcode extension. See 環境への GitHub Copilot 拡張機能のインストール.
Configuring MCP servers in Xcode
-
Open the GitHub Copilot for Xcode extension.
-
In agent mode, click the tools icon.
-
Select "Edit config".
-
Define your MCP servers, editing
mcp.json. You can use the following configuration as an example:JSON { "servers": { "memory": { "command": "npx", "args": [ "-y", "@modelcontextprotocol/server-memory" ] } } }{ "servers": { "memory": { "command": "npx", "args": [ "-y", "@modelcontextprotocol/server-memory" ] } } }
Overview
モデル コンテキスト プロトコル (MCP) は、アプリケーションが大規模言語モデル (LLM) とコンテキストを共有する方法を定義するオープン標準です。 MCP は、AI モデルをさまざまなデータ ソースとツールに接続する標準化された方法を提供し、それらがより効果的に連携できるようにします。
MCP を使用すると、Copilot Chat を既存のさまざまなツールやサービスと統合することで機能を拡張できます。 また、MCP を使用して、Copilot Chat で動作する新しいツールとサービスを作成することもでき、エクスペリエンスをカスタマイズおよび強化できます。
MCP の詳細については、MCP 公式ドキュメントを参照してください。
For information on other currently available MCP servers, see the MCP servers repository.
Prerequisites
- Copilot へのアクセス権。 GitHub Copilot in Eclipse を使うには、アクティブな GitHub Copilot サブスクリプションが必要です。 Copilot のアクセス方法の詳細については、「GitHub Copilot とは何ですか?」を参照してください。
- Eclipse の互換バージョン。 GitHub Copilot 拡張機能を使うには、Eclipse バージョン 2024-09 以降が必要です。 Eclipse のダウンロード ページを参照してください。
- Latest version of the GitHub Copilot extension. Download this from the Eclipse Marketplace. For more information, see 環境への GitHub Copilot 拡張機能のインストール.
- Sign in to GitHub from Eclipse.
Configuring MCP servers in Eclipse
-
To open the Copilot Chat panel, click the Copilot icon () in the status bar at the bottom of Eclipse.
-
From the menu, select "Edit preferences".
-
In the left pane, expand Copilot Chat and click MCP.
-
Define your MCP servers. You can use the following configuration as an example:
JSON { "servers": { "memory": { "command": "npx", "args": [ "-y", "@modelcontextprotocol/server-memory" ] } } }{ "servers": { "memory": { "command": "npx", "args": [ "-y", "@modelcontextprotocol/server-memory" ] } } }
Creating a new MCP server
You can create a new MCP server to fulfill your specific needs, and then integrate it with Copilot Chat. For example, you can create an MCP server that connects to a database or a web service, and then use that server in Copilot Chat to perform tasks on that database or web service.
For more information on creating and configuring your own MCP servers, see the official MCP documentation.